Outdoor Classroom Overview:
In this project we were asked to design an outdoor space that was comfortable and pleasant in all conditions, such as windy or sunny, without the use of electricity. We first started this project by learning the concepts about Atomic state, structure, and heat. Then my group and I learned about conduction, convection, radiation, and we learned about solar angles and how they change during different seasons and how they play the roles in heating a solar water heater lab that we built. In addition we designed a turbine that we could use to generate electricity, but unfortunately due to how much the cost of a normal wind turbine is there was no way we could have added one to our design .After doing these mini experiments we made a survey to know what the student body and staff wanted in their outdoor classroom. After we got the results back, we used them to choose where and what should be in the outdoor classroom based on our clients needs. Once we knew what we needed to build, we needed to know what to build it out of. So, we tested the heat conductivity of certain materials and how certain materials absorb water, and found the best materials to make our outdoor classroom out of. Then, we made designs, sketches, and blueprints of everything that was needed for the outdoor classroom, and we found out the cost of all of it. From there we made a presentation and then presented it to a panel of judges who graded on our features, material choice, presentation, blueprints, budget, model, and how buildable it was.
Mini projects:
Solar Water Heater
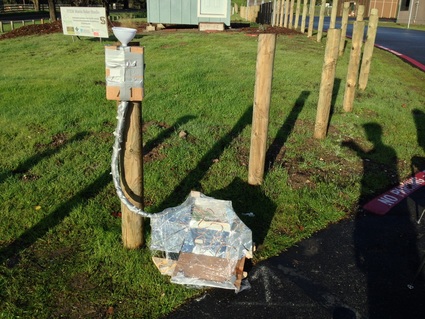
Before we started this passive solar water heater lab, we knew nothing about it. So we learned about the three types of heat transfers which are conduction, convection, and radiation. Convection is the transfer of heat through liquid or gas. Radiation is the transfer of heat through waves/rays/particles. While Conduction is the transfer of heat through solids. We also learned about insulation which doesn't transfer heat well, but it reflects the light that hits it onto something else. We learned about these energy transfers and insulation to know how to transfer the energy from the sun to the water in our water heater to heat the water up. From there we started making a list of materials,creating a blueprint, and then we put it all together in about three days. We made it out of plastic heating, soft copper tubing,plastic tubing, a water container, insulation (cotton balls), mirrors, wood, cardboard, a plastic funnel,and duct tape. Even though there were many materials that were needed to create it the design of our solar water heater was fairly simple. First we poured water into the funnel which is connected to a water bottle, and that water bottle was in a cardboard box surrounded by cotton balls that we hoped would make good insulation and would keep it warm. Then the water goes out of the bottom of the water bottle into a plastic tube surrounded by insulation and duct tape, and into a copper tube. The copper tube then zig-zags across differently angled mirrors that are reflecting the sun at the copper tubes, and heats it up.From this experiment, we learned that when the light hit the copper tubing, the heat was transmitted through to the water, which is convection. We also learned that metal is a great conductor compared to something like plastic because it has better conduction. Our design went pretty well thanks to our knowledge about all the concepts we were taught and in the end our water heated up about 6 degrees Celsius.
Solar Angles
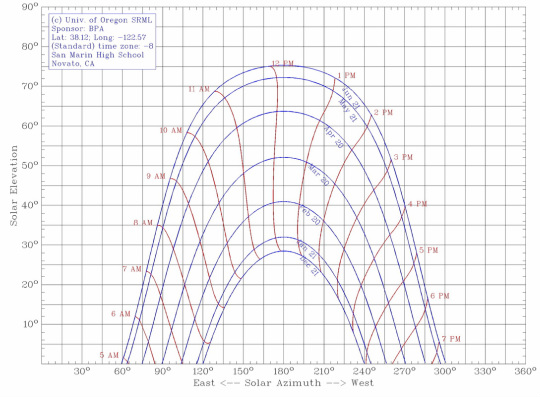
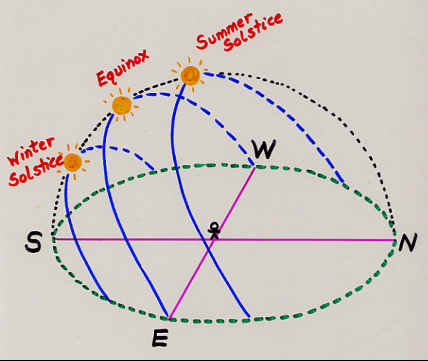
In order to keep our outdoor space warm in the winter and cool in the summer we had to learn about the different angles of the sun and how and why they change. Earth's axis is tilted at a 23.5 angle causing the suns light hits the earth at different angles. The sun hitting the Earth at these different angles causes the earth to have seasons. For example when the earths orbit has the angle where the Sun hits the Northern Hemisphere vertical, the Northern hemisphere has summer, while when the northern Hemisphere tilt is away from the sun, hittting the Northern hemisphere at a slant we have winter. This is the same for the Southern hemisphere. Also when the suns rays hit the earth slanted it covers more of a surface area but because of the that the heat and brightness of the sun's rays are less. While when it hits the earth directly it covers less area but the heat and brightness the rays produce in that area is greater. We also learned that in the winter, the sun is lower than in the summer, We used this info to build our pergola. We knew that in the winter since it was colder because of how the sun's rays hit we didn't need much shade ,so we gave the option of having half of our benches in the sun, while in summer when people want shade we gave them the option of having the benches in the shade. We did we able to do this by using all these concepts about the sun's solar angles.
Wind Turbine Lab
Our goal for this lab was to design a wind turbine blade to maximize voltage output at low, medium, and high wind speeds for VAWT (vertical axis wind turbine) and HAWT (vertical axis wind turbine) Our group found out that aluminium was the best material and that pinwheels are the best design, especially at high wind speeds.Pinwheels were the best design because it got more energy in Vawt and Hawt in higher wind speeds then any other one.This is because they can spin the fastest because of their wind pockets and air flow. Metal pinwheel are better than the other types of material because they bend less to the wind and that causes it to be able to catch more wind, so it transfers a lot more kinetic energy to the turbine, unlike a flimsy paper one.
More Evidence and Reasoning Below:
Clients Needs Survey:
For this mini project we made a survey to see what the students and teachers of San Marin High School wanted in their outdoor classroom. To make this, every group made questions of the most important things we need to know on an online survey that was easily accessed. Our group made the question: Which of the following places would you use? and gave a list of names in which the could choose from.The top two answers we received were Outdoor lounge ( students) and Outdoor Classroom ( teachers). After thinking about it we choose Outdoor Classroom for our name because the majority of teachers wanted that name and the teachers are the ones bringing their class to this outdoor classroom.The button below is a link to all the data we received from our survey.
Site Selection:
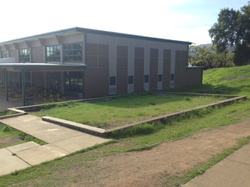
The site selection was an important part of our outdoor classroom, because it needed to fit all the needs of the students and teachers. We had four sites that we considered, but ultimately choose the location between the art room and cafeteria. We picked it because it because fit more of the needs of our clients which were level ground, sunlight/shade exposure, distance from campus, ground quality, wifi strength, and wind block. It has good level ground and has buildings between it to block sun and wind. It also is right in the middle of campus, has fairly dry ground, and has excellent wifi strength. We also picked it because there is already a 41 foot by 26 foot concrete perimeter around our location which is convenient, and it already has a pathway to get to it. This spot was the perfect spot for our outdoor classroom.
Materials Heat Testing Lab
This project or lab was about finding what materials heated up the quickest and cooled down the quickest, or what materials absorbed the most water and what materials dried out the quickest. So together as a class we designed this lab to test all the possible materials we would be using, such as pine wood, cement, rubber, redwood, sand, brick,plexiglass, etc. First we put the materials under a heat lamp and recorded the temperature every two minutes for 10 minutes, then we took it out from under the heat lab, and checked every two minutes util it returned to starting temperature .For the water part of the lab we weighed our material and wrote down the weight, and then we soaked it with water and checked every five minutes to record what was happening until it felt dry and weighed what it did at the beginning .Unfortunately, later on we realized that when its raining, people are not going to want to go out to the classroom, so the water test was useless. We did learn a lot about what materials we did want and didn't want because of heating lab.Thanks to the results we found, we figured out that the ones that rise high in temperature are probably not the best to build with because they could get too hot, and hurt someone. So, the best materials are the ones that remain relatively unchanged by the heat lamp.
Presentation
We presented our outdoor classroom on March 14, 2016, to the panel of judges and parents.The judges graded us on our presentation tactics, our key features, usability, client need, energy location, material choice, blueprints, budget, model, and feasibility. Some of the key features in our presentation was our pergola, plants, and our student picnic tables. We also created a scale model of everything in our design from our teachers desk to our whiteboard. Our presentation included blueprints, aesthetics, total cost and much more. In this project we were in the budget's realm and had a full material list with all the prices to show it (button below). Overall the presentation went smoothly with all the key features we needed.
Building Design
Our design was not very complex. We wanted a design that was simple enough for anyone to build, but with everything that the students and teachers wanted. We built a outdoor classroom with six picnic tables, one teachers desk, one whiteboard, one pergola, and trees and plants. For more info, look above in Presentation.
Concepts
Atoms: Basic structures of all matter
Nucleus - center of an atom
Molecule- multiple atoms bonded together (example:H2O, CO2, C6H12O6, O2)
Compound -type of molecule with different types of elements bonded together
Isotope -an atom with an unusual number of neutron
Molecular Structure: Describes the type, arrangement, position, and direction of the bonds linking atoms within a molecule.
States of Matter:
Solid-Molecules barely move. Ex. ice
Liquid- Molecules move around. Ex. water
Gases- Molecules move the fastest. Ex. steam
Specific Heat Capacity: The specific heat capacity is the amount of heat required to change a unit mass of a substance by one degree in temperature.
Conduction: Heat transfer through a solid. Some solids are better at transferring heat (Ex. Copper> Aluminum)
Convection: Movement of heat through a fluid (liquid or gas)
Radiation: Transfer of heat through waves/rays/particles
Insulation: Opposite of conduction (bad at transferring heat)
Laws Of Thermodynamics:
0th Law- Explains Temperature (If two systems are in thermal equilibrium with a third system, they are in equilibrium with each other)
1st Law- Conservation of energy (Energy is neither created or destroyed, but transferred from one form to another. Heat is a form of energy)
2nd Law- Entropy increases (Disorder increases. Over time everything becomes the same temperature)
3rd Law- Temperature can never get to absolute zero. Heat always exists.
Why should you use less electricity?
For this part of the project we learned about different energy sources (pros, cons, and how they work) and how it is effecting our world we live in.
Reflection
In all this project went very well. There were pits in this project, but there were many more peaks. The things we did really well in this project was we were very efficient in getting our work done. If someone was working on one thing another person was working on another, like me and Sebastian. When Sebastian was working on the design of the whiteboard I was working on the scale model of it. Another thing we did well was come together as a team, at first it was a bit shaky because a couple of people weren't getting along, but eventually they settled their differences and helped each other out. Although there was many good things are group did, there was some things that we did not excel at well. One of them was contributing to the group project evenly. One person would be working on the designs of a table, while another would be on there phone or watching you tube videos. Another thing we need to work on is getting along. Although we did come together eventually, we need to not fight at all during this project. One time someone was messing around with another one, turning off there computer. Instead of our group stopping it, we just watched and did not stop it and I now realize that even though it isn't hurting anyone, we should not have been messing around. Some things I could do better in this project is to work on compromising more, instead of shooting down ideas. When we were deciding on where we should have put the classroom I was dead set on the one in between the cafeteria and art building. Even though it did have everything we wanted ,there were other options too but I would not even think about them, which was not okay. Another thing I need to work on, is making sure that are group gets along and that there is no tension between us. There are many things that I learned in this project. One thing I learned was how to make scale model of objects, which means I know how to scale things down now. Another thing I learned was that different materials are better conductors than others, which I did not know before. Overall this project was very fun, and if I could I would do it again.
