Purpose
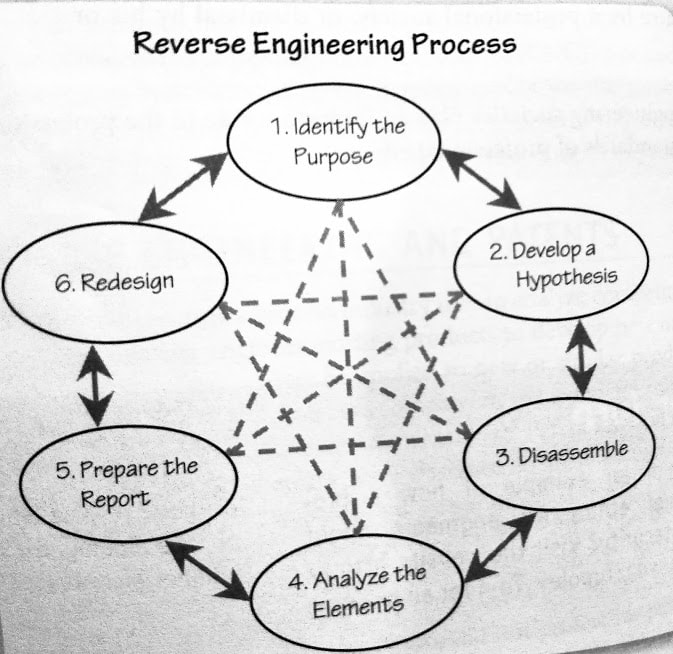
The main question we were trying to solve in this project was how to reverse engineer a calculator. Basically, we had to figure out how we can take apart and put back together a calculator. We also wanted to learn about each part of the calculator and its purpose, and how each part works with each other. Before we started our project we went through the six steps of reverse engineering. The steps that we followed were we identified the purpose, we developed an hypothesis, we dissembled it, we analyzed the elements, we prepared the element, and we did a product redesign. We also had a gannt sheet that kept us organized on what we had to complete each day.
We started by drawing a sketch of the calculator together. Then, we took apart the calculator and drew a diagram of the taken apart calculator. We drew the side, front, and back views of it. We then labeled the diagram and stated all the connections. We found the measurements of the calculator and made a diagram of it. We found the calculators purpose which is to calculate math equations using buttons and a circuit board. I then found the parts of the calculator and their function. The protective empty husk holds the calculator together, the circuit board computes all equations, the connective paper connects the circuit board to screen, the backboard holds calculator together and protects circuit board, The metal sides connect to the core (power source), the button cell is the battery or power source of calculator, the screws hold together the protective piece, the protective cover holds the power or button cell in place, the rubber button sheet allows use of circuit board, and the stubble indent holds the calculator in place. We also found the materials of each part of the calculator. We found the price, identification numbers, and the manufacturer of the calculator. We found out that the calculator can be recycled. We also answered four questions about the purpose of the calculator. The four questions are how does the circuit board and the rubber buttons work together, how does the circuit board work, how does the screen work, how does a circuit board translate a message into the LCD screen. After we answered the four question we did a project redesign. After all this data collecting and research we then created a slide presentation which we presented September 24, 2018.
We started by drawing a sketch of the calculator together. Then, we took apart the calculator and drew a diagram of the taken apart calculator. We drew the side, front, and back views of it. We then labeled the diagram and stated all the connections. We found the measurements of the calculator and made a diagram of it. We found the calculators purpose which is to calculate math equations using buttons and a circuit board. I then found the parts of the calculator and their function. The protective empty husk holds the calculator together, the circuit board computes all equations, the connective paper connects the circuit board to screen, the backboard holds calculator together and protects circuit board, The metal sides connect to the core (power source), the button cell is the battery or power source of calculator, the screws hold together the protective piece, the protective cover holds the power or button cell in place, the rubber button sheet allows use of circuit board, and the stubble indent holds the calculator in place. We also found the materials of each part of the calculator. We found the price, identification numbers, and the manufacturer of the calculator. We found out that the calculator can be recycled. We also answered four questions about the purpose of the calculator. The four questions are how does the circuit board and the rubber buttons work together, how does the circuit board work, how does the screen work, how does a circuit board translate a message into the LCD screen. After we answered the four question we did a project redesign. After all this data collecting and research we then created a slide presentation which we presented September 24, 2018.
Evidence of Project
Reverse Engineering Report
| stem_calc.rtf |
Concepts
- Reverse engineering: A strategy used to find answers to questions about an existing product that are used in the design of another product.
- Invention: Design work that results in something unique or novel
- Innovation: Process of improving or modifying an existing product
- Design Process: An iterative or repeating decision-making process that results in a plan to produce a new product. A problem-solving strategy with criteria and constraint used to develop many possible solutions, to solve a problem or satisfy human needs and wants and to narrow down possible solutions. The goal of the design process is also to minimize undesired effects and control risk.
- Problem Solving: The process of understanding a problem, devising a plan, carrying out the plan, and evaluating the effectiveness of the plan to solve a problem or meet a need or want.
- Constraints: Engineers design under constraints.This means that there have limits on the time, money and resources allowed to do their work.
- Technology can be broadly defined as: The process of design, that is, solving problems with criteria and constraints. The product, system or environment that results from the design. The new understanding or knowledge gained through the design and production of a product.
- Team: A group with a common purpose that achieve a specific goal using each individual's skills and mutual cooperation to produce the end product.
- Synergy: Results when the unit or team becomes stronger than the sum of the individual members.
- Norms: Principles of right action. They are binding upon the members of a group and serve to guide, control, or regulate proper and acceptable behavior.
- Values: Guiding principles or ideals.
- Consensus: Agreement in opinion; collective opinion.
- Six basic"constraints" of project management: scope, schedule, resources, budget, quality (does it meet standards),risk.
- What is it’s purpose (What is it supposed to do)
- What is the basic function?
- What real-life problem/human need is the object solving/address?
- What are the functions of its parts/components?
- How does it turn on (if applicable)?
- What is the mechanism to do that...?
- How do things fit together (functional relationships between its parts/components, connections)?
- What is it made of (materials, be specific)?
- Why do you think they used those materials to build the object?
- Are there any identification numbers/codes on it or within it ? What do they mean?
- What are some physics/technology principles involved in its functioning?
- What are the measurements of the overall object and of its components?
- What is its price?
- Is it recyclable?
- How would you improve it?
Reflection:
Looking back at the Reverse Engineering Project now, I can see we accomplished a lot with the time given to us. We worked together as a team, for example,when we first decided on which object we took apart, we came together and all contributed ideas amongst ourselves until we decided on taking apart a calculator. Also when one person was listing the materials of the calculator, another person was answering one of our four main research questions. Not everything was perfect though, we struggled with finding the manufacturer of the calculator. We tried calling the realtor who bought the calculator, but we received no response. Next time, I will try to call him over and over again until I receive a response.
Some skills I have acquired from building this project are how to draw a sketch of a product. At first I had know idea where to start. I didn't know you where suppose to draw side views, front views, and back views of the calculator taken apart and put together. But, after researching sketches of reverse engineering diagrams I modeled mine after those pictures. Another thing I learned was from myself. Usually, when I am in groups there are not many people who try or even care, so usually I do all the work and barely communicate with the others. In this group everyone cared about their work and it was amazing, but I was not used to communicating with other people in a group that much, so I had to learn. Eventually, I communicated what I was going to do and asked if there was any suggestions. An example is when I was in the slide shows I suggested we add a manufacturer slide. If I had not communicated about that,we might have received a lower grade.
Some things that I could have done better, and that I will continue working on are staying a bit more focused, and challenging myself more. Sometimes during the project I would go over to my friends project and talk to her and about her project instead of doing something for our project. Next time I will try to limit my talking time with her and focus more on the project. Also in this project I worked on the parts of the calculator slideshow. Unfortunately, I messed up and called the ribbon cable of the calculator a connective paper. If I had not messed up I could have reduced the errors in this project. When the time comes again that a concept is faulty in my project, instead of letting it go, I will strive to make it as reliable as I can, even if I have to come after school to do it. Overall this project was a great experience where I learned things about myself and the science concepts.
